Kotlin: A Comprehensive Guide to Kotlin Programming
What is Kotlin?
Kotlin is a statically-typed programming language that runs on the Java Virtual Machine (JVM). It’s designed to be concise, expressive, and interoperable with Java, making it popular for Android app development and general-purpose programming.
Advantages of Kotlin:
- Conciseness: Kotlin requires less boilerplate code compared to Java, resulting in cleaner and more readable code.
- Interoperability: Kotlin seamlessly integrates with existing Java codebases, allowing for easy adoption and migration.
- Null safety: Kotlin’s type system helps prevent null pointer exceptions at compile-time, enhancing code reliability.
- Coroutines: Kotlin provides built-in support for asynchronous programming through coroutines, simplifying concurrent tasks.
- Tooling support: Kotlin is supported by robust IDEs like IntelliJ IDEA and Android Studio, offering features such as code completion and refactoring tools.
Disadvantages of Kotlin:
- Learning curve: Developers unfamiliar with Kotlin may face a learning curve, especially when transitioning from Java.
- Compilation speed: Kotlin’s compilation time can be slower compared to Java, especially in large projects.
- Community and ecosystem: While growing rapidly, Kotlin’s ecosystem and community support may not be as extensive as Java’s.
- Adoption in non-Android projects: Although gaining traction, Kotlin’s adoption outside of Android development is still relatively lower.
- Limited support for older platforms: Some older Java frameworks and libraries may not fully support Kotlin, requiring workarounds or adaptations.
Difference between mutable variable and immutable variable in Kotlin
In Kotlin, variables can be categorized into two main types based on whether their values can be changed after they are initialized: mutable and immutable.
1. Mutable Variables:
- Mutable variables are declared using the
varkeyword. - The value of a mutable variable can be changed after it is initialized.
- Mutable variables are suitable for scenarios where the value needs to be updated or modified over time.
- Example:
kotlin
var count: Int = 5
count = 10 // Valid - changing the value of mutable variable 'count'
2. Immutable Variables:
- Immutable variables are declared using the
valkeyword. - The value of an immutable variable cannot be changed after it is initialized.
- Immutable variables are suitable for scenarios where the value should remain constant throughout the program execution.
- Example:
kotlin
val pi: Double = 3.14
// pi = 3.14159 // Invalid - cannot assign a new value to an immutable variable 'pi'
In summary, mutable variables allow their values to be changed after initialization, while immutable variables do not permit changes to their values once they are initialized. Choosing between mutable and immutable variables depends on the specific requirements and design of your program. Using immutable variables whenever possible is often encouraged as it can lead to safer, more predictable code.
What are functions in Kotlin? How to declare and call the function in Kotlin?
In Kotlin, arguments are values that are passed to a function or constructor when it is called or invoked. These arguments can be used by the function or constructor to perform some operation or computation. Arguments can be of various types, including primitive types, objects, or even functions themselves.
Example demonstrating the usage of arguments in a function:
kotlin
fun greet(name: String) {
    println("Hello, $name!")
}

fun main() {
    val userName = "John"
    greet(userName) // Passing the value of userName as an argument to the greet function
}
This demonstrates how arguments are used to pass data to functions in Kotlin, allowing them to perform operations based on the provided values.
2 Write a short notes on : i) Services ii) Broadcast receiver
i) Services:
- Services are background tasks in Android that perform operations without a user interface.
- They can be started using
startService()and stopped usingstopService(). - Services can run indefinitely and continue even if the app is not in the foreground.
ii) Broadcast Receiver:
- Broadcast Receivers listen for and respond to system-wide broadcast announcements.
- They enable applications to react to events like the device booting up, battery status changes, or network connectivity changes.
- Broadcast Receivers can be registered statically in the manifest or dynamically in code, and they execute the
onReceive()method when a matching broadcast is received.
Write a short notes on : i) Fragments ii) Intents
i) Fragments:
- Fragments are modular sections of an Android application’s user interface.
- They represent a portion of a user interface or behavior in an activity.
- Fragments allow for the creation of more flexible and reusable UI components.
- They can be added, removed, replaced, and rearranged within an activity’s layout at runtime.
- Fragments have their lifecycle, similar to activities, which allows for managing their state and behavior independently.
- They are commonly used to build responsive and dynamic user interfaces, especially in larger screen sizes or multi-pane layouts.
ii) Intents:
- Intents are a fundamental part of the Android system for communication between different components of an application or between different applications.
- They serve as a messaging system to request an action from another component, such as starting an activity, broadcasting a message, or delivering a data payload.
- Intents can be explicit, targeting a specific component within the same application, or implicit, allowing the system to determine the appropriate component to handle the request based on its intent filters.
- They can carry data in the form of key-value pairs called extras, which can be used to pass information between components.
- Intents support various actions, such as opening a web page, making a phone call, sending a text message, sharing content, etc., providing rich interaction capabilities to Android applications.
- Intents are essential for building interactive and interconnected applications, enabling seamless navigation and interaction between different parts of the system.
1 What are annotations? How to declare and apply the annotations?
Annotations in Kotlin are a form of metadata that can be added to code elements such as classes, functions, properties, parameters, etc. They provide additional information about the code without affecting its functionality directly. Annotations are used for various purposes such as providing hints to the compiler, controlling code generation, specifying behavior, or enabling runtime processing.
To declare an annotation in Kotlin, you use the `annotation` keyword followed by the annotation name and optional parameters if needed. Here’s a simple example:
syntax
annotation class MyAnnotation(val value: String).
example
@MyAnnotation(“This is a custom annotation”)
class MyClass {
// Class body
}
2 Explain arguments in Kotlin with a suitable example.\
In Kotlin, arguments are values that are passed to a function or constructor when it is called or invoked. These arguments can be used by the function or constructor to perform some operation or computation. Arguments can be of various types, including primitive types, objects, or even functions themselves.
Here’s a simple example demonstrating the usage of arguments in a function:
fun greet(name: String) {
println(“Hello, $name!”)
}
fun main() {
val userName = “John”
greet(userName) // Passing the value of userName as an argument to the greet function
}
This demonstrates how arguments are used to pass data to functions in Kotlin, allowing them to perform operations based on the provided values.
What are visibility modifiers in Kotlin? And its types.
Visibility modifiers in Kotlin control the visibility or accessibility of classes, interfaces, functions, properties, and other members within Kotlin code. They determine which parts of the code are accessible from other parts of the codebase.
Types of Visibility Modifiers:
1. `public`: The default visibility modifier. It makes the declaration accessible from anywhere.
2. `internal`: Allows access within the same module. Module here refers to a set of Kotlin files compiled together, like a Gradle module or IntelliJ IDEA module.
3. `private`: Limits access to the same class or file. Members marked as private are visible only within the same class or file.
4. `protected`: Allows access within the same class or subclasses. It’s not available for top-level declarations (outside classes).
Example:
class Example {
public val publicVariable = 10
internal val internalVariable = 20
private val privateVariable = 30
protected val protectedVariable = 40
// Methods
public fun publicMethod() {}
internal fun internalMethod() {}
private fun privateMethod() {}
protected fun protectedMethod() {}
}
Explain the android architecture with a diagram
Sure, here’s a concise explanation of the Android architecture with a simplified diagram:
1. **Linux Kernel**: The foundation layer responsible for core system functionalities such as memory management, process management, and device drivers.
2. **Hardware Abstraction Layer (HAL)**: Provides a standardized interface for hardware-specific implementations, ensuring that upper layers of the Android stack remain hardware-agnostic.
3. **Android Runtime (ART)**: Executes and manages Android applications. It includes core libraries and runtime features like garbage collection.
4. **Native Libraries**: Essential components written in C/C++, including the media framework, SQLite, and more.
5. **Java API Framework**: Rich set of Java APIs for building Android applications, managing UI, handling lifecycle events, and interacting with system services.
6. **System and User Applications**: System apps provide core functionalities, while user apps are developed by third-party developers and installed by users.
**Diagram:**
+——————————–+
| User Applications |
+——————————–+
| System Applications |
+——————————–+
| Java API Framework |
+——————————–+
| Native Libraries |
+——————————–+
| Android Runtime |
+——————————–+
| Hardware Abstraction |
| Layer (HAL) |
+——————————–+
| Linux Kernel |
+——————————–+
What are Fragments? Explain the Fragments life cycle
Fragments are modular sections of an Android application’s user interface. They represent a portion of a user interface or behavior in an activity. Fragments allow for the creation of more flexible and reusable UI components. They can be added, removed, replaced, and rearranged within an activity’s layout at runtime. Fragments have their lifecycle, similar to activities, which allows for managing their state and behavior independently.
Fragment Lifecycle:
1. **onAttach()**: The fragment is attached to its parent activity.
2. **onCreate()**: The fragment is created. Initialization tasks can be performed here.
3. **onCreateView()**: The fragment’s UI is created. Layout inflation and UI initialization occur here.
4. **onViewCreated()**: The fragment’s view hierarchy has been created. Any additional UI setup can be done here.
5. **onActivityCreated()**: The activity’s `onCreate()` method has completed, and fragment’s activity is fully initialized.
6. **onStart()**: The fragment becomes visible to the user. It is now active.
7. **onResume()**: The fragment is interacting with the user and is fully visible.
8. **onPause()**: The fragment is partially obscured or about to be stopped, but still visible to the user.
9. **onStop()**: The fragment is no longer visible to the user and is being stopped.
10. **onDestroyView()**: The fragment’s view hierarchy is being destroyed.
11. **onDestroy()**: The fragment is being destroyed. Cleanup tasks can be performed here.
12. **onDetach()**: The fragment is detached from its parent activity.
Understanding the fragment lifecycle helps in managing UI updates, handling configuration changes, and ensuring proper resource management within the Android application.
Explain the activity life cycle with a suitable diagram.
The Android activity lifecycle consists of several states: Created, Started, Resumed, Paused, Stopped, and Destroyed.
Activity Lifecycle:
1. **onCreate()**: Activity is created. Initialization tasks are performed here.
2. **onStart()**: Activity is becoming visible to the user.
3. **onResume()**: Activity is visible and interactive.
4. **onPause()**: Activity is partially visible or losing focus, but still running.
5. **onStop()**: Activity is no longer visible to the user.
6. **onDestroy()**: Activity is being destroyed. Cleanup tasks are performed here.
7. **onRestart()**: Activity is being restarted after being stopped, but before being started again.
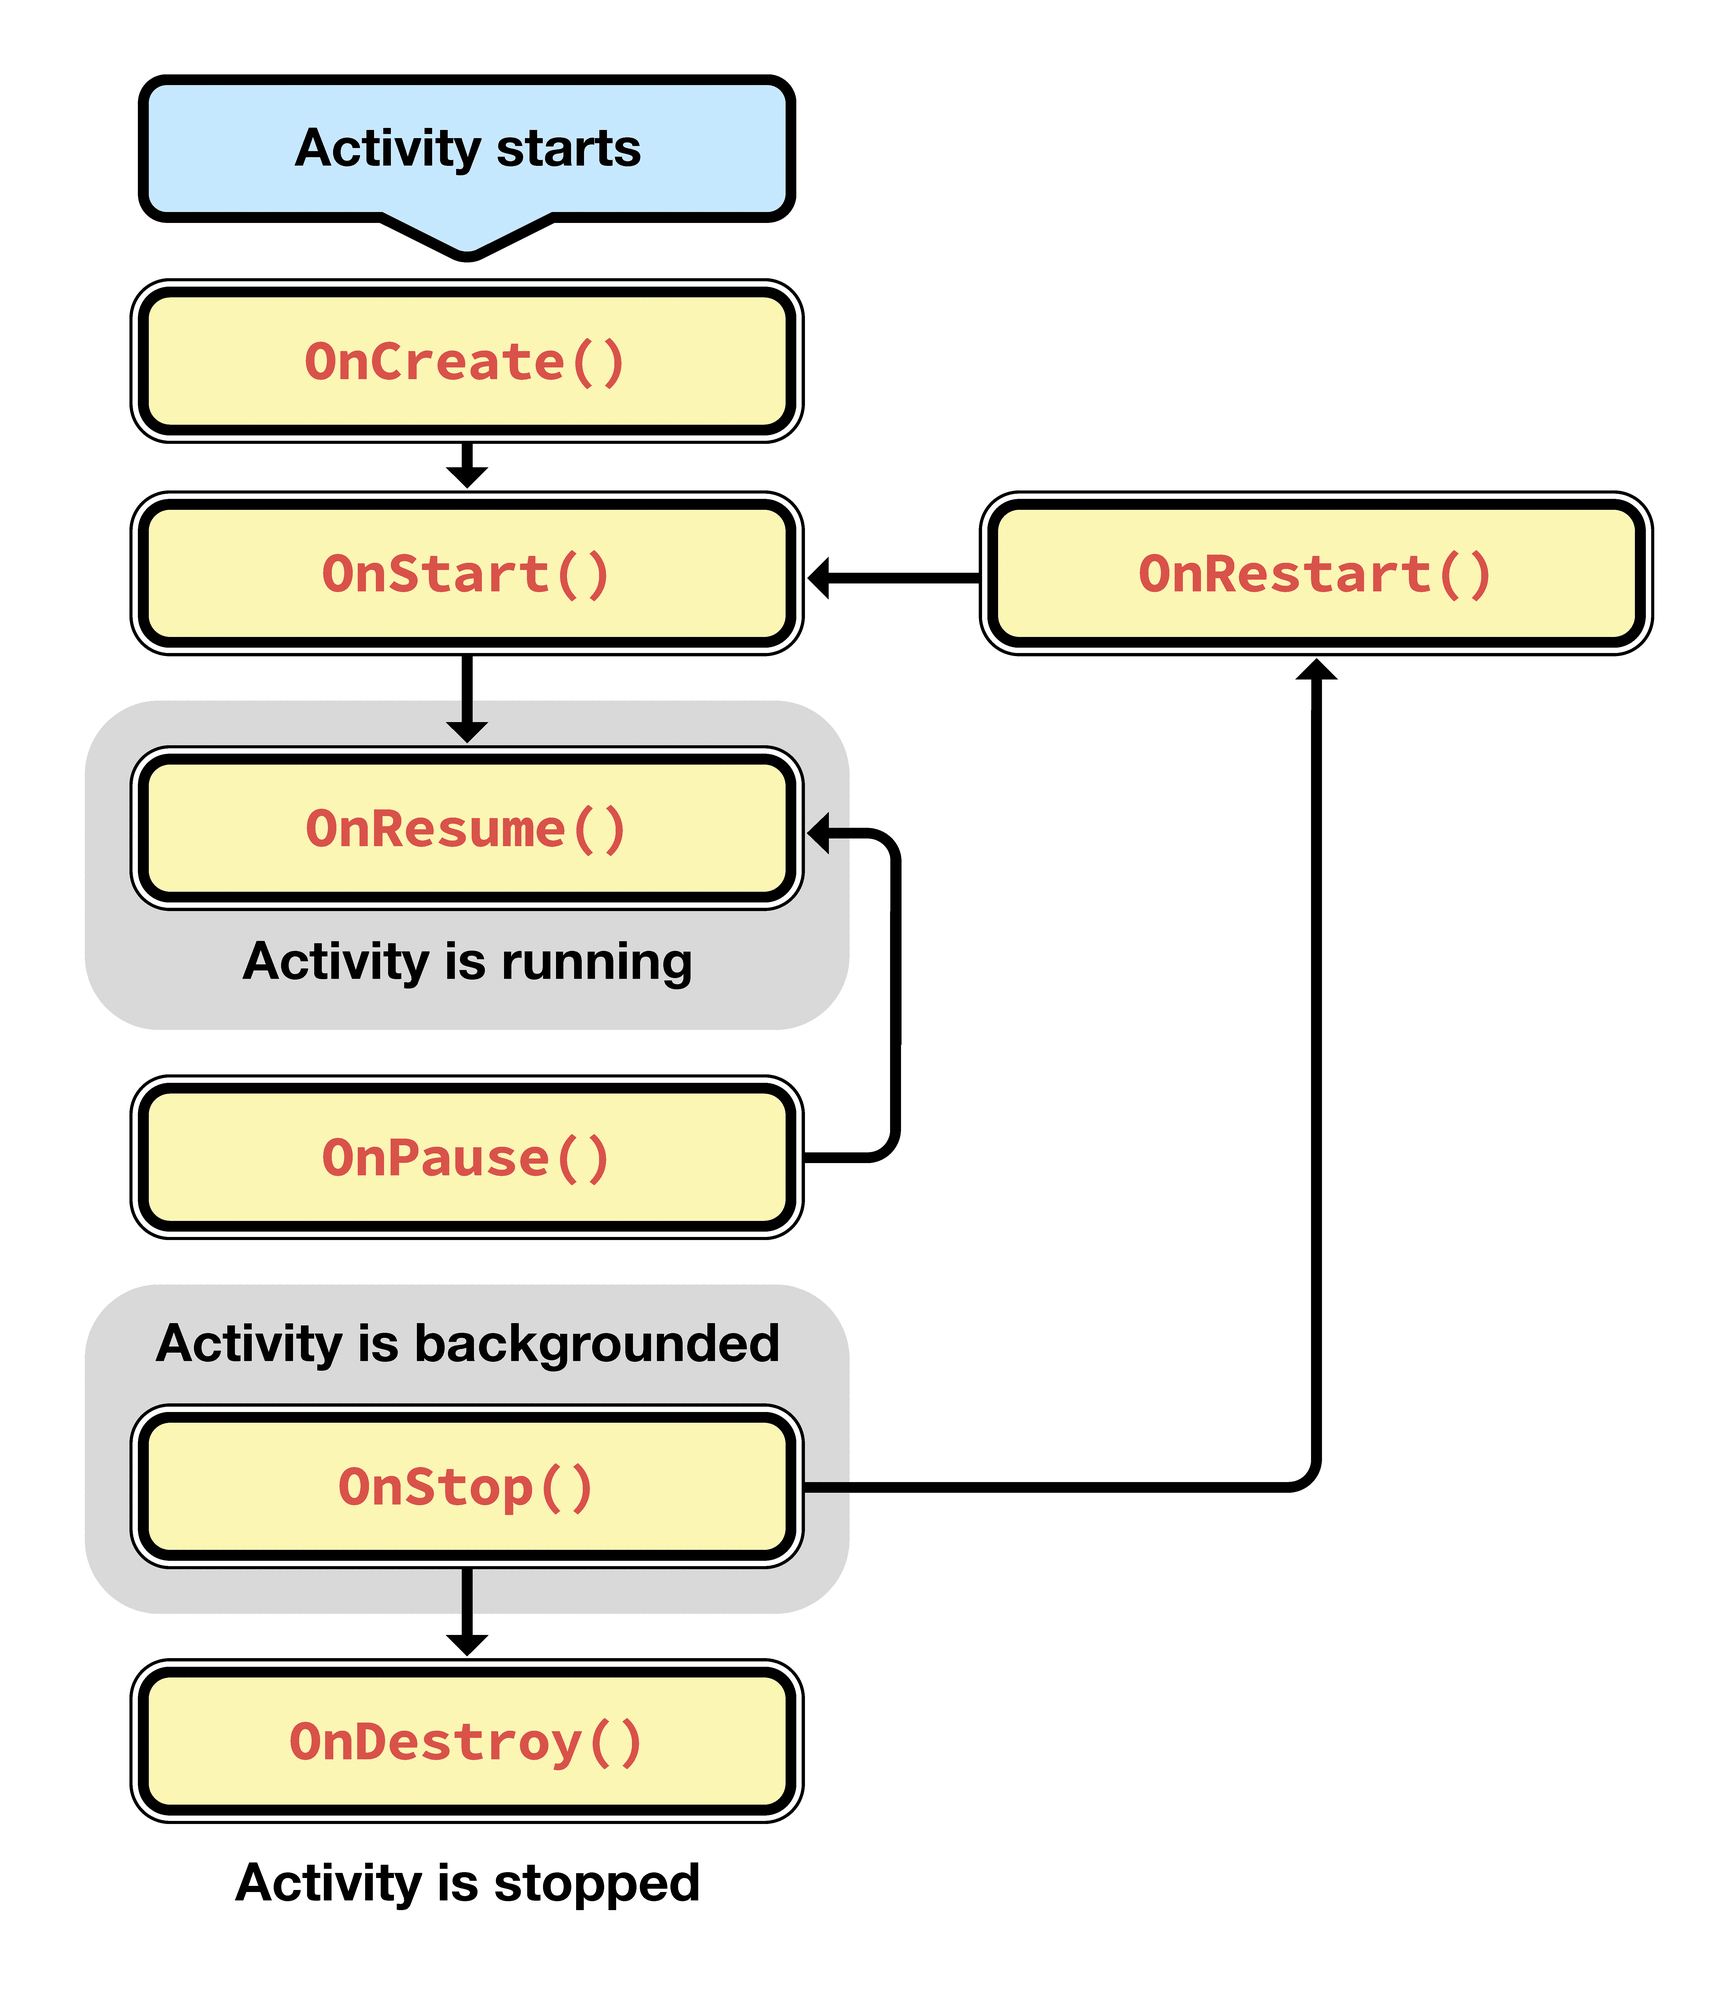
Understanding the activity lifecycle is crucial for managing UI updates, handling configuration changes, and ensuring proper resource management within Android applications.